
How To Soundproof a Basement Ceiling? {6 Proven Ways}
Is your basement too noisy due to noise from upstairs? If so, we have the solution, and you probably already know what it is: soundproofing your basement ceiling.
Whether you want to set up home offices in your basement, turn it into a studio or you just want to make it quiet and peaceful, soundproofing the ceiling of your basement plays a crucial role in it.
To be honest, many people find this task expensive and challenging because they lack clear and straightforward guidance on how to soundproof a basement ceiling.
However, In this guide, we’ll provide you with six proven and affordable ways to soundproof your basement ceiling, which even beginners can easily accomplish even with a small budget.
And whether your basement ceiling is finished or unfinished you will get actionable tips from here. Let’s get straight to the point:
6 Proven Ways to soundproof a basement ceiling
1: Fill gaps & cracks and fix creaking floorboards
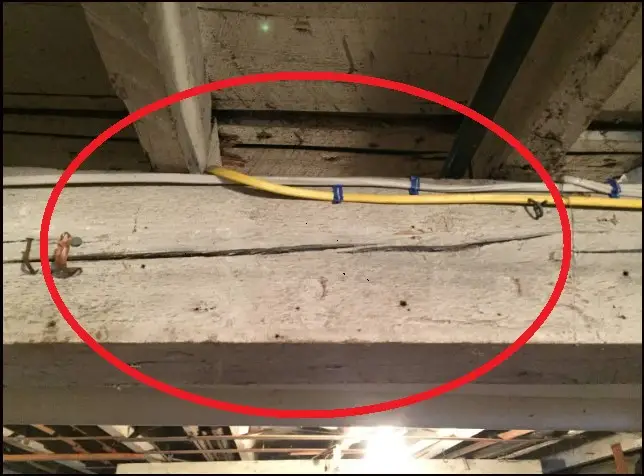
Fixing gaps, cracks and creaking floorboards is undoubtedly the most important part of soundproofing an unfinished basement ceiling. As you likely know, sound travels through the air, and any gaps and cracks make it easy as fu*k for sound to pass through.
So it is important to seal them. To seal them, first, you need to identify them. To identify them, use a flashlight and take a look at the corners of each and every ceiling joist and mark any gaps and cracks you find. Now use acoustic caulking to fill and fix them.
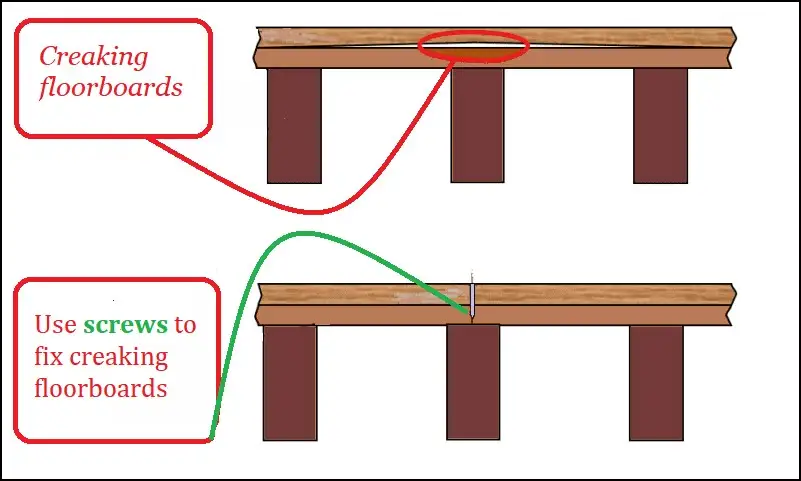
In addition, fixing creaking floorboards is just as important as sealing gaps and cracks as mentioned earlier. Creaking floorboards often result from loose fasteners, moisture, humidity, and natural wood movement. To fix them, use a foam pad under the joists or subfloor boards where a lot of movement occurs and nail it.
And for boards that have gaps, you can fill them with green glue, and for boards that have nails or screws sticking out, just fix it with new nails. Now you have completed the first step of soundproofing your basement ceiling.
2: Fill the joist with mineral wool insulation

Filling the joist with mineral wool insulation is an easy and effective way to make a ceiling soundproof. It can really be a game-changer.
Mineral wool insulation is a material made from either stone or silica. It’s known for its excellent sound-absorbing properties and ability to trap air, which helps block sound transmission. According to Inspectapedia, Mineral wool has an STC rating of 42.
Their cost typically ranges from $1.40 to $2.10 per square foot, which sounds like expensive but they are really not once you know that they also provide thermal insulation, which is why they are called “mineral wool insulation.”
To use mineral wool to soundproof your basement ceiling, first, measure the size of your basement ceiling joist and calculate how much insulation you will need using this formula: (Joist Bay Length x Joist Bay Width) x Number of Joist Bays
Then, use a utility knife or insulation cutter to cut the mineral wool insulation to fit the joist gaps precisely and carefully insert these cut insulation pieces into the joist gaps. That’s all there is to it!
3: Install SONOpan with mineral wool insulation
If you yearn for a basement where you can enjoy peace and quiet, away from the noise above then combining SONOpan with mineral wool insulation could be the perfect solution for soundproofing exposed joist basement ceiling.
SONOpan is a soundproofing material that is designed to reduce airborne and impact noise. It’s a super dense, eco-friendly product that can significantly enhance the soundproofing of your space. SONOpan panels have an STC rating of 27 and can reduce noise by 10 dB. (know more)
They come in 4-foot-by-foot sheets and are usually priced at less than a dollar per square foot, making them a slightly more affordable option compared to traditional drywall.
As mentioned earlier, mineral wool insulation is composed of natural minerals and is well-known for its exceptional sound absorption properties. When combined with SONOpan, they can effectively reduce noise by 25 decibels.
So, how do you go about installing them?
- Well, first things first, calculate how much mineral wool and SONOpan sheets you will need by using the formula I provided earlier.
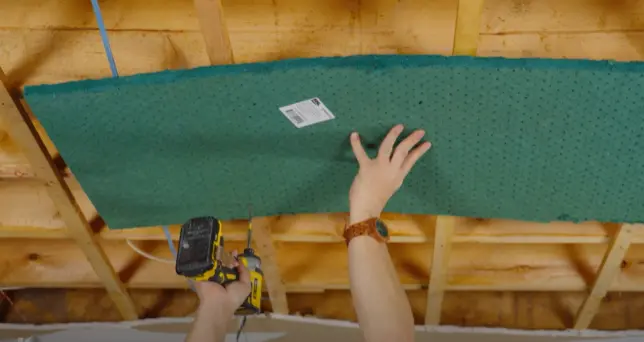
- Once you have the materials, stuff the basement ceiling joists with the mineral wool.
- Once you finished filling the joists, attach SONOpan sheets over it directly to the ceiling joists using screws, as you can see in the image below:
The cost of implementing this technique typically ranges from $250 to $280 for a 10 by 10-foot square basement ceiling. So it is best for those who are looking to cheaply soundproof the basement ceiling.
4: Install a layer of ⅝ drywall sheets
Using drywall for soundproofing the basement ceiling is a well-known and effective option. There are several ways to use, one way is to attach a layer of 5/8 drywall sheet directly to the ceiling.
According to soundproofingMLV.com, 5/8-inch drywall sheets have an STC (Sound Transmission Class) rating of 33, and provide you a noise reduction of 20 dB. Moreover, according to Kristen Cramer, a standard 5/8-inch drywall sheet typically costs between $10 to $20, which is quite reasonable.
To use drywall for soundproofing your basement ceiling, follow these steps:
- Purchase the drywall sheets according to the size of your basement ceiling. I would recommend reading this article (https://www.thespruce.com/how-to-estimate-drywall-step-by-step-tutorial-844379) for guidance on estimating the drywall requirements.
- Now plan the layout by placing the sheets to the roof and cut the drywall sheets if needed.
- Now, lift the drywall sheet to the ceiling with the help of another person or by using a drywall lift.
- Securely attach the drywall to the ceiling joists using 1-1/4 inch screws, leaving a gap of 12 to 16 inches between screws for proper support.
- After finishing the installation of the drywall, take one step further and tape and mud the seams for a smooth and clean finish.
- Allow the drywall compound to dry, and once it’s dry, you can paint the ceiling as you wish. And you are good to go!
If you want to get even more noise reduction, then you need to go extra miles and use two layers of drywall sheets. While this approach will double the cost, it will also double the noise reduction capabilities. The installation process of the second layer of drywall remains the same.
5: Use MLV with drywall sheets
If you’re willing to spend more than $500 to make your basement ceiling really quiet, here’s a great suggestion: use mass-loaded vinyl (MLV) along with ⅝-inch drywall sheets.
MLV is heavy but thin and is very, very dense and because of this, it does a really great job at reducing sound. One-pound MLV sheets have an STC (Sound Transmission Class) rating of 26 and cost between $1 to $2 per square foot.
I recently conducted an experiment with MLV and found that it can reduce noise by nearly 29 decibels, which is quite impressive.
As mentioned earlier, drywall has an STC rating of 33. So, if you combine STC 26 from MLV with STC 33 from drywall, you get superior soundproofing. This is literally one of the most effective ways to soundproof a basement ceiling.
This combination of MLV plus drywall can reduce the noise by 35 dB which is really significant. Follow this simple 3-steps process to soundproof your exposed joist basement ceiling with this technique:
- Roll out the MLV sheet onto the basement ceiling and staple it to the joists.
- Lift up the drywall sheet and attach it over the MLV using 1-1/4 inch screws.
- Finish the job by taping and mudding the drywall seams to achieve a polished look.
6: Use mineral wool insulation + SONOpan + ⅝ drywall sheets
In my opinion, the best way to soundproof a basement ceiling is to use mineral wool insulation + SONOpan + ⅝ drywall sheets, it is my favorite!
This is the technique I have used to make my basement ceiling soundproof and it cost me around $2390. It is the best way to soundproof a ceiling to get rid of upstairs noise.
This method, which I call the “Ceiling SoundGuard Trio,” is way more effective than traditional methods because it has a combination of sound-absorbing to sound-deadening material. This is exactly how I use this technique to noise-proof my unfinished basement ceiling.
- First, I filled the ceiling joists with two layers of mineral wool insulation for better sound absorption.
- Then, I added a layer of SONOpan sheet over the insulation for further sound absorption and reduction.
- Finally, I covered it all with a layer of 5/8-inch thick drywall sheet. I taped and mudded the seams to finish it off.
My investment of $2390 in materials and effort was well worth the priceless serenity I gained. I tested its noise reduction power by literally asking one of our team members to play football above my basement and I don’t even feel he is playing.
However, this is the most expensive trick for soundproofing, so I only recommend it if you are super serious about noise reduction or you have a bigger budget. Give it a try, and experience the difference yourself!
How to soundproof an unfinished basement ceiling?
To soundproof an unfinished basement ceiling, start by sealing gaps and cracks with acoustic caulk. Then, fill joists with mineral wool insulation for sound absorption then consider attaching SONOpan or 5/8 inch drywall sheet over the insulation, this option is an affordable yet effective option.
For better noise reduction, combine mass-loaded vinyl (MLV) with drywall. For even better soundproofing, Ceiling SoundGuard Trio”: mineral wool insulation + SONOpan + 5/8-inch drywall sheets would be the option I would recommend, though it’s pricier but it offers exceptional soundproofing.
How to soundproof a finished basement ceiling?

To soundproof a finished basement ceiling, attach acoustic panels with NRC rating of 0.7 or higher, this option is cheap and doable.
Alternatively, for the most effective soundproofing solution, you can opt for installing a drop ceiling with soundproofing ceiling tiles.
This option is way more expensive than the first option. According to HomeAdvisor, the cost of installing a drop ceiling can range from $5 to $28 per square foot, including labor and materials.
Related: https://soundproofaddict.com/how-to-soundproof-a-concrete-ceiling/
How to soundproof a basement ceiling without drywall?
In my opinion, the best way to soundproof a basement ceiling without drywall is to fill the ceiling joist with mineral wool insulation.
If the cost of filling your basement ceiling joist is just a fraction of your budget then I would recommend attaching SONOpan sheets over it.
Just stuff the joists with mineral wool, then attach SONOpan sheets directly to the ceiling joists using screws. So consider your budget and your needs then take the right action.
Related: 4 Ways to Soundproof a Condo Ceiling
FAQs: Basement ceiling soundproofing
Q1. What is the best sound barrier for basement ceiling?
Ans: Mineral wool insulation is the best sound barrier for basement ceiling.
Q2. What is the best way to soundproof a basement ceiling?
Ans: Using mineral wool insulation + SONOpan + drywall is the best way to soundproof ceiling.
Q3. How to soundproof a basement drop ceiling?
Ans: To soundproof a basement drop ceiling replace the ceiling tiles with soundproof ceiling tiles. However, if you want to do it cheaply then attach acoustic panels to make your basement drop ceiling soundproof. (How to make a drop ceiling soundproof?)
Q4. What are the best materials to soundproof the basement ceiling?
Ans: Mineral wool insulation, fiberglass, SONOpan, drywall, acoustic panels, or soundproofing ceiling tiles are some of the best materials for soundproofing basement ceilings.
Q5. What is the cheapest way to soundproof a basement ceiling?
Ans: In my opinion, the cheapest way to soundproof a basement ceiling is to fill the ceiling joist with mineral wool insulation or fiberglass.
Q7. What can I use instead of drywall for the basement ceiling?
Ans: I would recommend you use SONOpan sheets instead of drywall for the basement ceiling.
Q8. How much does it cost to soundproof a basement ceiling?
Ans: The cost of soundproofing a basement ceiling can vary widely depending on factors such as the size of your basement, the soundproofing materials and techniques you choose, and whether you do the work yourself or hire professionals. As a rough estimate, the cost can range from $250 for basic soundproofing measures to up to even $1,500 or more for more advanced solutions. (Read: How much does it cost to soundproof a ceiling?)
Thanks I have just been looking for information about this subject for a long time and yours is the best I’ve discovered till now.
Thanks for the appreciation! By the way, did you soundproof your basement ceiling?