
How To Soundproof a Ceiling? {7 Proven Ways}

Well, I can’t stress you enough that soundproofing a ceiling is the most complex part of soundproofing a room.
We all know how annoying it can be to hear every footstep or conversation from upstairs, and this is something that no one, literally no one wants.
At the end of the day, we want a peaceful and quiet living space, right? Absolutely! And having a soundproof ceiling is the key to achieve this.
So, how do you go about soundproofing your ceiling to create a more peaceful and restful living environment?
Well, that’s exactly what I am going to share with you today and give you 7 proven methods to make your ceiling soundproof. But before we dive into the details, let’s set the stage…
How does sound travel through ceilings?

Well, sound travels through a ceiling in two primary ways: airborne sound transmission and impact sound transmission.
- First, there’s airborne sound, like people talking, playing music, or just making noise in the room above.
- These sound waves travel through the air and eventually reach your ceiling. If your ceiling materials can’t absorb or block them effectively, some sound waves pass through and become audible in the room below.
- Then, there’s impact sound, which happens when physical actions, like footsteps or things being dropped, create vibrations on the floor above.
- These vibrations travel through the building’s structure, including the ceiling, and end up causing noise in the room below.
To keep your living space serene and quiet, you’ll want to use the right materials and techniques that can either block or soak up these sounds, so your home remains a peaceful haven. Let’s see how you can do so.
6 Effective methods for soundproofing a ceiling
1: Attach cork sheets with drywall to ceiling
Drywall is super effective sound blocking materials, and to be honest, without using you won’t get an effective result, it can easily reduce sound by 25 dB.
Cork sheets, on the other hand, are also very effective at reducing noise. I recently tested its effectiveness by attaching it to my door and surprisingly, I got a noise reduction of nearly 23 decibels.
And when you combine these two materials you easily tackle those airborne and impact noise from upstairs. This technique can be used to both noise proof a joist ceiling as well as a concrete ceiling.
First let’s see how you use cork sheets with drywall to make your joist ceiling soundproof. Materials you will need:
- Cork sheets
- Drywall sheets
- Green glue adhesive
- 2-inch drywall screws
- Screwdriver or drill with appropriate bits
Steps you need to take:
- Take a sheet of cork and a sheet of drywall. Apply green glue evenly on the cork sheet and drywall and join them and press them together firmly to create a strong bond.
- Now, attach this cork-covered drywall to the ceiling joists using 2-inch drywall screws by spacing the screws about 16 inches apart.
- Repeat the same process again-and-again until you are done covering your entire ceiling with these combinations of materials.
For soundproofing a concrete ceiling, these are the extra materials you will need for concrete ceiling:
- Masonry drill bit.
- Resilient sound clips.
- Furring channels
And these are the steps you need to take:
- Your first step in soundproofing your concrete ceiling is to measure and mark straight lines with a gap of 24 inches between each of them on the ceiling. Then, make small chalk marks every 16-24 inches along these lines.
- Now, drill holes using a masonry drill bit on every chalk mark you marked earlier.
- After you’ve drilled the holes, it’s time to install “resilient sound clips.” These clips are designed to minimize the transmission of sound vibrations through the concrete ceiling. Line up the resilient sound clips with the holes you’ve drilled and secure them in place by attaching them to the concrete using appropriate screws.
- In step four, you need to securely connect the furring channels to the resilient sound clips you installed in the previous step.
- Now, follow the same process of applying cork sheets to drywall using green glue, just like we did for the joist ceiling.
- Finally, screw this combination of cork and drywall to the furring channels. That’s it; you’re all set!
Now, when it comes to the cost, it’s more affordable to soundproof an exposed joist ceiling compared to a concrete one. For an unfinished ceiling, you can expect to spend around $300 to $400 for a standard-sized area.
However, if you’re dealing with a concrete ceiling, you’ll need some extra materials like resilient sound clips and furring channels, which can bring the cost up to about $450 to $580.
2: Install acoustic cloud ceiling
If you are hunting for a fancy way to soundproof your ceiling, acoustic cloud ceilings can be a viable option for you.
While acoustic cloud ceilings are effective at improving the acoustics of a room, they are not that much good at blocking upstairs noise. You’ll often find these types of ceilings in places like restaurants, churches, universities, and office spaces.
The price of installing an acoustic ceiling varies depending on the type of panels you choose, but as a ballpark figure, it can set you back between $9 to $15 per square foot, or even more.
While it is possible to install acoustic cloud ceilings yourself, it can be a complex task, especially for larger installations. It often involves securely suspending the panels from the ceiling using cables, brackets, or other hardware.
For best results and safety, it’s recommended to hire a professional contractor with experience in acoustical installations.
3: Decoupling a ceiling from a concrete slab
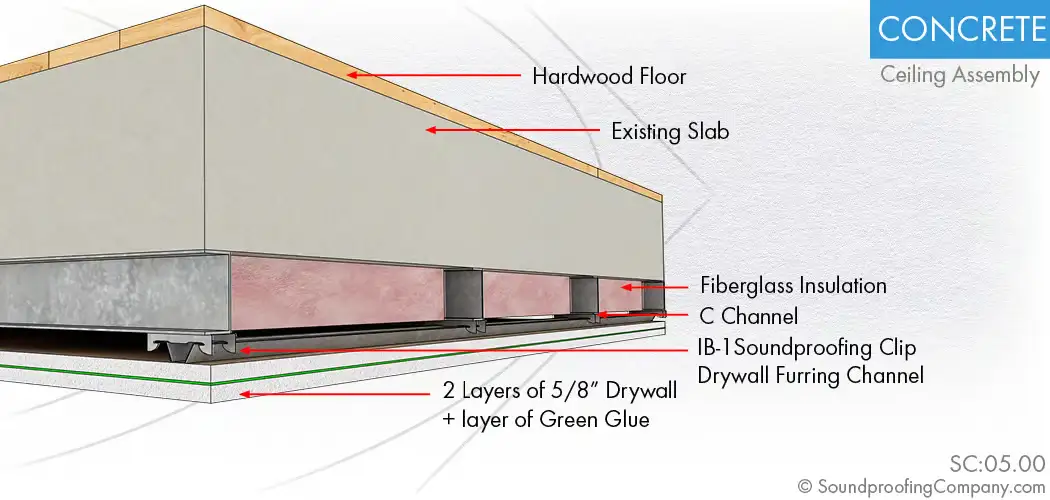
Concrete ceilings are pretty good at sound blocking, anyway, but if you are still experiencing impact noises from upstairs and want to tackle it by soundproofing your ceiling then consider decoupling a ceiling from a concrete slab.
Decoupling simply means creating a separation between your ceiling and the concrete slab. By doing this, you break the direct pathway for sound to transfer through the solid structure.
This reduces both impact and airborne noises from upstairs, making your space much quieter. But it is not as easy and affordable than it actually sounds.
This method can cost you between $3.7 to $5 per square foot, and I am not pushing you but it’s totally worth every penny in terms of noise reduction and thermal insulation you get, which can even save you money on your energy bills.
Follow this 7 steps process to make your concrete ceiling soundproof using this method:
- Step 1: Get the necessary items like sound clips, C channels, screws, drywall, and mineral wool insulation.
- Step 2: Mark straight lines on the ceiling with 24-inch gaps and make chalk marks every 16-24 inches for attaching C channels.
- Step 3: Drill holes at the chalk marks and then secure the C channels to the ceiling with screws or bolts.
- Step 4: Attach resilient sound clips to the C channels to support the furring channel.
- Step 5: Link the furring channels to the sound clips securely.
- Step 6: Fill the gaps between the furring channels with mineral wool insulation for better sound absorption.
- Step 7: Fix 5/8-inch drywall sheets to the furring channels with drywall screws, and consider painting or mudding and taping for a finished look.
For more detailed instructions, I recommend you check out this article: https://soundproofaddict.com/how-to-soundproof-a-concrete-ceiling/
4: Fill the ceiling joist with mineral wool insulation
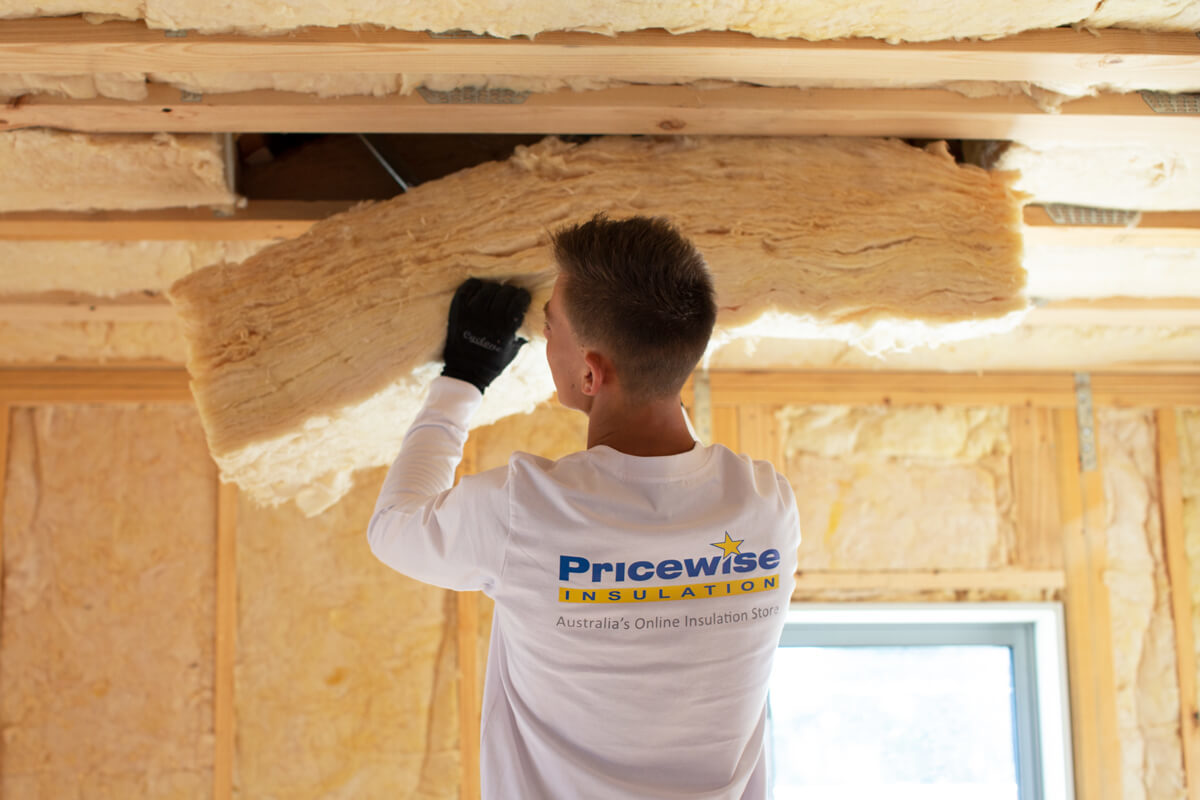
If you have an exposed joist ceiling and you want to make it quieter, one of the best ways to do it is by using mineral wool insulation.
It is a sound absorbing material that does its job very, very, very nicely, you can’t doubt about it. Its cost ranges from $1.4 to $2.1 per square foot, which is a fair range.
According to sciencedirect, mineral wool is mainly made from rocks or slag, making up about 98% of it. The remaining 2% is organic material. Filling the spaces between ceiling joists with mineral wool is easy.
One thing to keep in mind when filling is a snug fit, forget everything, if the batts are not snugly fitted between the joists then it won’t be as effective as it used to be. So make sure it is snugly fitted and leave no gaps between the joists.
5: Mineral wool insulation with ⅝” drywall or SONOpan
If you have a budget of less than $350 then there is really no better way to soundproof your ceiling than using mineral wool insulation with ⅝” drywall or SONOpan.
You already know about mineral wool insulation and drywall, both are the top-notch materials for soundproofing.
However, you might not know about SONOpan, basically, it is a type of panel that absorbs and reduces noise pretty nicely and it’s a bit more budget-friendly than traditional drywall.
But drywall is way more effective than SONOpan. II did some real-world testing, and the results were pretty striking. Drywall can cut down noise by a whopping 25 decibels, while SONOpan, though good, manages around 15 decibels. That’s a significant difference.
So I recommend you use 5/8″ drywall for soundproofing the ceiling. Using this technique is really easy. First, fill the ceiling joist with the wool insulation and attach the drywall or SONOpan sheet right on top of it.
The installation cost of mineral wool and drywall combined is $2 to 3 per square foot. Now, go and use this technique and stop hearing your upstairs stomping.
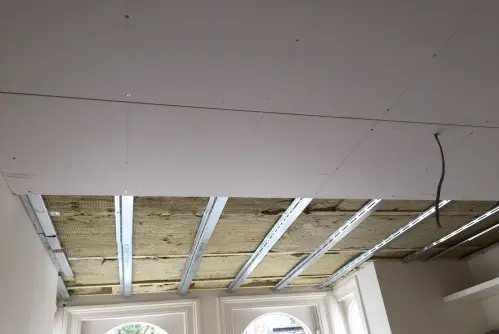
6: Attach two layers of ⅝” drywall with green glue between them
One of the most efficient ways to soundproof a ceiling is to attach two layers of drywall with a layer of green glue sandwiched in between. This technique works like crazy and it’s capable of cutting down the noise by more than 50 dB.
Drywall doesn’t need any introduction, I have told a lot about it earlier so I am not going to repeat the same thing again and again.
Anyway, according to tmsoundproofing.com, two layers of drywall with green glue has an STC of approximately 45, which is higher in the scale.
This method can be used to soundproof both finished ceiling and exposed joist ceiling.
For an unfinished ceiling, you will need some 5/8 inch sheets according to your ceiling size and some green glue compound tubes. You will need a tube of green glue to attach two sheets of drywall together.
And to attach this combination you will need 3-inch drywall screws and keep in mind to place the screws every 16 inches.
And for soundproofing a finished ceiling with this technique, you will first need to attach the “Resilient sound clips” to the ceiling every 24 inches by drilling a hole into the ceiling.
Then, connect furring channels to the clips. Finally, you’ll go ahead and install the combination of drywall + green glue + drywall, using 3-inch drywall screws by screwing them directly into the furring channel.
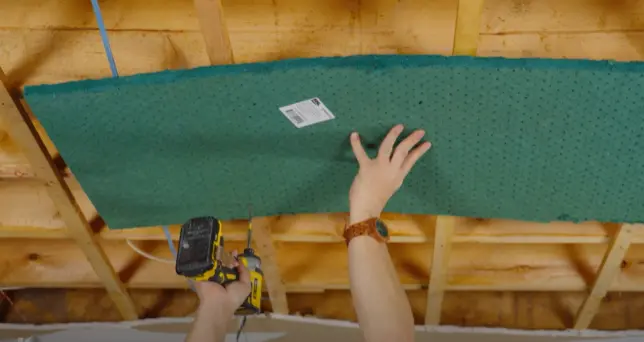
7: Use mineral wool + MLV + ⅝” drywall
Soundproofing with a combination of mineral wool, Mass Loaded Vinyl (MLV), and 5/8″ drywall is a potent way to transform your living space into a haven of tranquility.
It’s a multi-layered approach that excels at tackling both airborne and impact noise. However, this technique is only applicable for unfinished ceilings.
Here are the three main steps you need to take to get this done:
Step 1: Start by filling those ceiling joists with mineral wool insulation. This stuff is fantastic at absorbing and dampening noise by essentially quelling those sound vibrations.
Step 2: Next up, you introduce MLV. It’s a heavyweight champion when it comes to blocking out sound. It brings the mass and density needed to create a barrier that sound struggles to penetrate.
Step 3: And to seal the deal, you top it off with 5/8″ drywall. This final layer ensures that the soundproofing fortress is complete.
This layered technique is incredibly effective, and that’s mirrored in the cost. It’s a bit on the pricey side, ranging from $4 to $6 per square foot for installation. But believe me, the results are worth every penny, as this method is capable of killing noise by over 55 dB.
Related: How make a drop ceiling soundproof?
My final thought
Soundproofing the ceiling is really the most practical solution to deal with noise from upstairs, whether it is upstairs stomping or their tv sound.
To achieve this, I have mentioned here 7 ways to soundproof a ceiling ranging from affordable options to more advanced and expensive solutions. You can choose the method that fits your budget and what you need.
From those, using using mineral wool + MLV + ⅝” drywall is the most effective option for soundproofing an unfinished ceiling and for concert ceiling decoupling a ceiling from a concrete slab is the best way.
If you are looking for solutions for basement ceilings then using mineral wool with SONOpan sheets is an excellent choice, or you can also go about using drywall instead of SONOpan.
For soundproofing apartment ceilings, attaching two layers of drywall with green glue between them is a really great way to achieve a sound blocking ceiling.
Talking about the cost, the cost of “effectively soundproofing a ceiling” can be anywhere between $100 to $590 for a standard 10×10-foot ceiling depending on the methods you use.
So, which method are you going to try? Let us know in the comments below.
Your experience might just help someone else find their quiet sanctuary. Say goodbye to the upstairs stomping, and hello to a noise-free living space!
Next post to read: https://soundproofaddict.com/how-to-soundproof-a-condo-ceiling/